

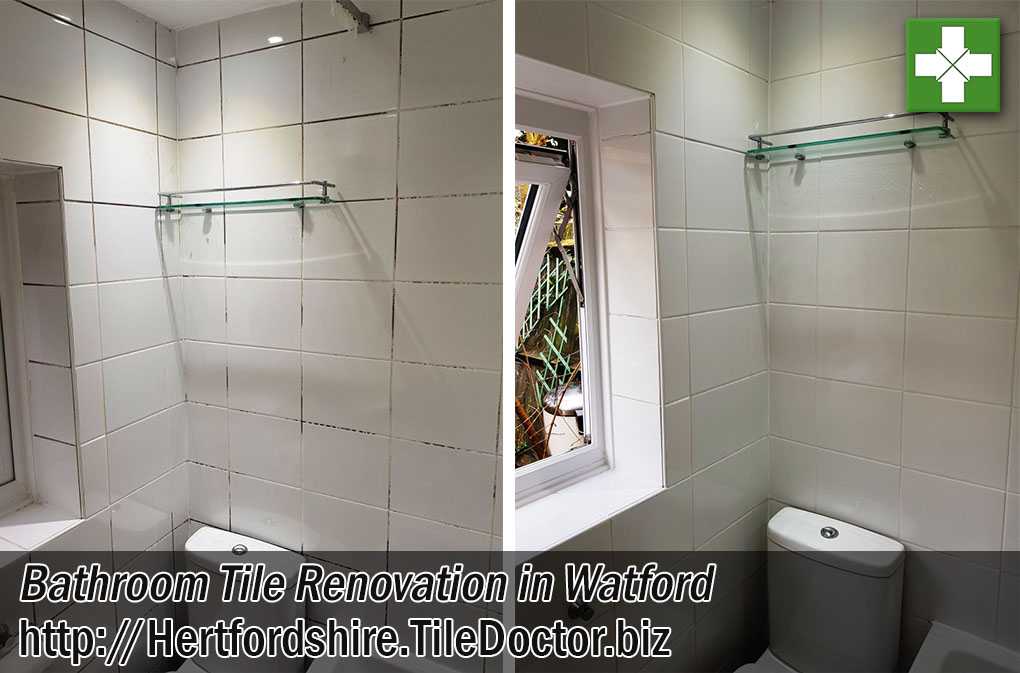
Ceramic Wall Tile and Grout Renovated in a Watford Bathroom
Our client in Watford, Hertfordshire had a fully Ceramic tiled bathroom which was now in need of a deep clean. The tiles themselves were in good physical condition but the grout and silicone sealant were stained black with mould in places and generally not looking very attractive.
 |
 |
I visited the property to survey the problem and offer a solution. The tiles were indeed looking grubby but with white ceramic tiling the mould stained grout particularly stood out. Mould loves a moist warm environment so the only way to cure it in the long term is to significantly improve ventilation. It can be removed with the right products however, so I explained the cleaning process, agreed a price for the work and booked in a convenient time to do the renovation.
Cleaning a Ceramic Tiled Bathroom
We prepared the areas with protective sheets and tape to threshold edges then applied a specialist double action cleaning product called Tile Doctor Duo Clean. The product is spayed onto the tile and grout, left for five minutes and then scrubbed in using small polypropylene tile pads and detail brushes.
Duo clean is especially formulated to clean grout and remove mould and so an ideal choice for this situation. Working in sections the tile and grout were thoroughly scrubbed and then rinsed off with water to remove the dirt and mould that was released. The tiles were then inspected, and the process carried out a second time. For stubborn areas we used steam to really lift the ingrained dirt out of the grout.
Ceramic tiles have a glazed surface which is very easy to clean so our main focus was the grout which being cementitious does attract dirt and allow mould to get a hold.
Replacing Silicone Sealant in a Ceramic Tiled Bathroom
Last step was to replace the silicone sealant between the bath and tile. This is best removed with a sharp knife taking care not to damage to scratch the bath itself.
After removing all the old silicone, the bath was filled with water so it would adopt the right shape before being resealed. We then reapplied silicone to the bath and wall corner joints using white mould resistant silicone. This is a precise job which can easily look awful if not carried out correctly. Thankfully we have plenty of experience and this job took just one day to complete.
To finish the tile and grout were sprayed with Tile Doctor wall tile & grout sealer which comes in a convenient aerosol spray. The excess was wiped off the tile, as I mentioned before ceramic tiles are glazed so won’t hold a sealer, but the grout will benefit from it.
 |
 |
As you can see from the pictures the bathroom now looked as good as new, clean and tidy. The client was very happy with the outcome and now wasn’t embarrassed to let guests use his bathroom.
To maintain the ceramic bathroom tiles, we recommended the use of Tile Doctor Aqua-Pro tile cleaner which is ideal for maintaining porcelain/ceramic bathroom wall tiles. Aqua-Pro is an effective pH neutral tile and grout cleaner which is designed for everyday use in bathrooms. The neutral formula helps to eliminates soap scum build-up and hard water deposits which are all too common. It has a lovely fresh lemon scent which leaves the room smelling clean and fresh. It will help to prevent the discolouration they had previously experienced.
Professional Bathroom Grout Cleaning in Hertfordshire
Ceramic Wall Tile and Grout Renovated in a Watford Bathroom Read More »


