Victorian Tile Cleaning

Welcome to my Work History archive where you will find detailed examples of the cleaning and renovation of Victorian tiles carried out in Hertfordshire

Cleaning and Renovating Victorian Tiles

Commonly found in the hallways of oldder UK properties Victorian tiles are very hard wearing and can provide a classic look to any space. We often find that the beauty of these tiles are hidden under years of grime and neglect and are often covered up with carpets etc as tastes have changed over the years. If this sounds familiar then all is not lost as they can be restored.

The standard bearer for quality Victorian tiles was a firm called Minton Hollins, an English manufacturer who made a very good product which lasted the test of time. Victorian building practices however did not include the use of damp proof membranes and we often find damp can be a major issue with these old floors leading to salt problems known as efflorescence.

Common problems we face when restoring Victorian tiles are the removal of carpet glue, paint splashes and cement. Loose and cracked tiles can also be a problem however due to their popularity we usually find finding replacement tiles isn’t a problem.

Below you will find detailed examples of work we have carried out in the past, it should give you some idea of what’s involved and what can be achieved with the right techniques and products.


Edwardian Encaustic Floor Restoration Cheshunt

Edwardian Encaustic Tiled Floor Restoration in Cheshunt Hertfordshire

During an inspection for alteration work, this customer from Cheshunt discovered what appeared to be an original encaustic tiled floor under the hallway carpet. Keen to work out what it was, and have it restored, I was asked to pop round and look.

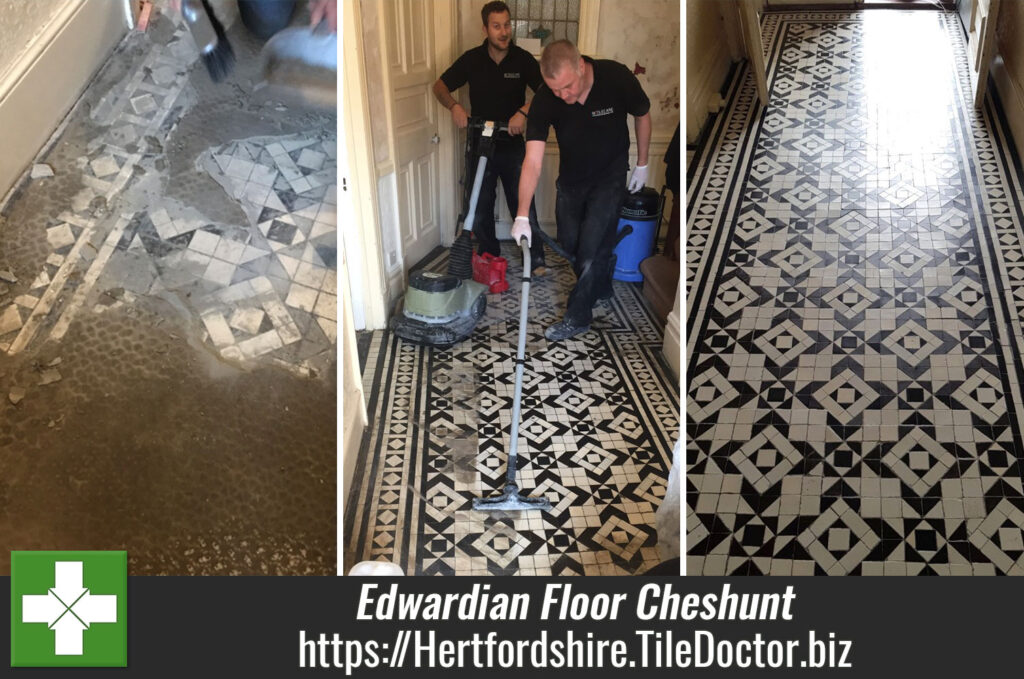
I went over as requested to survey the hallway floor and confirm their suspicions. The carpet had been secured with gripper rods glued onto the floor and that came away easily enough. Underneath, the tiles had been covered with self-levelling cement which had to be carefully scraped away to reveal the tiles.

Encaustic Tiled Floor Revealed Under Carpet Cheshunt

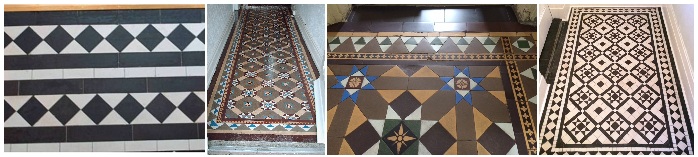
I ran a test to see if the cement leveller could be easily removed and using a combination of a scraper with Tile Doctor Pro-Clean, I was able to confirm the tiled floor was indeed salvageable. The house was Edwardian, and the tiles had been laid in a classic black and white geometric pattern typical of the period so I suspect the floor was indeed original.

I worked out a quote to restore the whole floor including the removal of the cement, deep cleaning and then sealing the tiles. Without removing all the cement, it would be difficult to price for replacing broken tiles, but I suspected there may be a few as its quite usual for a floor of this age. Keen to have the floor restored we were given the go-ahead and a date scheduled for the work to start.

Cleaning and Repairing an Encaustic Tiled Hallway

The first step was to remove all the carpet and gripper rod so we could see the full extent of the self-levelling screed. Once done it was a case of carefully chipping and scraping away to break up the cement until the tiled floor had been fully revealed. Its slow and detailed work but quite rewarding when the tiled floor is finally revealed. The tiles had survived well under the carpet and cement but as suspected a few repairs and replacement would be needed.

Encaustic Tiled Floor Cement Removal Cheshunt

With all the cement brushed away work moved onto cleaning which started with a strong dilution of Tile Doctor Pro-Clean applied to the floor and left to soak in for fifteen minutes the scrubbed in with a rotary machine fitted with a Black pad. A lot of soiling is generated from this which is rinsed off with water and extracted with a wet vacuum. The floor was then inspected and the process repeated where required.

Encaustic Tiled Floor During Machine Cleaning Cheshunt

The next step was to treat the tiles to an acid wash using Tile Doctor Grout Clean-up. This is applied as before and has several benefits including dissolving the remaining cement residue and neutralising the pH of the floor after the use of Tile Doctor Pro-Clean which is a strong alkaline.

The floor was then inspected and the broken tiles carefully removed so they could be replaced. This is delicate work as lifting a tile can sometimes upset its neighbour and before you know it the size of the work has tripled. Replacement tiles were then cut to fit the existing geometric pattern and secured into place with a rapid set adhesive and grouted in.

Once the replacement tile and grout had set, the floor was given a light clean using Tile Doctor Neutral Tile Cleaner and then left to dry out overnight.

Sealing an Encaustic Tiled Hallway

The next day the tiles were sealed using a single coat of Tile Doctor Colour Grow and the followed up with give coats of Tile Doctor Seal & Go. Colour Grow is an impregnator that soaks into the pores of the tile protecting it from within and improving colour, where as Seal and Go adds a nice subtle sheen to the tiles. Both products are breathable which is an important feature with old floors that don’t have a damp proof membrane.

Encaustic Tiled Floor After Cleaning Sealing Cheshunt

For aftercare I recommended Neutral Tile Cleaner which is a gentle but effective tile cleaning product that won’t damage the sealer.

Encaustic Tiled Floor Machine After Cleaning Sealing Cheshunt


Professional Restoration of an Encaustic Tiled Hallway in Hertfordshire

Edwardian Encaustic Tiled Floor Restoration in Cheshunt Hertfordshire Read More »

Victorian Tiled Hallway Floor Restoration Ware

Victorian Tiled Hallway Reconfigured and Fully Restored in Ware

Pictures below are from a Victorian tiled floor we recently reconfigured and renovated at a property in the town of Ware near Hertford. The floor had been covered in Vinyl for many years and underneath was the Victorian tiled floor and a section of Quarry tiles at the bottom of the stairs. Parts of the floor had also been dug up at some point in its long history and back filled with concrete, so it was now in quite a state. The owners were now keen to renovate the entire floor to create one consistent Victorian tiled hallway.

Victorian Tiled Hallway Before Restoration Ware Victorian Tiled Hallway Before Restoration Ware

To do the restoration the section of Quarry tiles would need to be removed, the concrete backfill would need to be dug up and then the subfloor would then need to be levelled so it could then be re-tiled with matching Victorian replacements. During that process the whole floor would need to be deep cleaned and then sealed. It would be a big job, but we like a challenge and more than confident it could be achieved to a good standard.

Happy with our quote the customer booked us in to do the work and we agreed a date for our return.

Cleaning and Repairing a Victorian Tiled Hallway Floor

First, we carried out a deep clean on the existing floor tiles using Tile Doctor Pro-Clean and Tile Doctor Remove and Go. We agitated the combined cleaning solutions using polypropylene floor pads fitted to a rotary machine and hand cleaned the grout using stiff brushes. The cleaning process lifts the dirt and old sealers out of the tiles which was removed using a wet vacuum. The tiles were rinsed with water to remove further dirt and further cleaned with steam to lift staining out of the tile.

The next step was to remove the concrete backfill out of the floor and border edges. These areas were carefully chased out to remove the concrete, and the immediate surround tiles carefully lifted.

We then carefully removed the existing quarry tiles and border tiles in the entrance area. The surrounding tiles were also carefully removed so that we could get back to a level where we can consistently follow on the floor pattern. A new subbase was then laid in preparation for the new tiles.

Victorian Tiled Hallway During Restoration Ware Victorian Tiled Hallway During Restoration Ware

When relaying replacement tiles into an existing pattern, it is important to ensure the configuration is consistent with the existing geometric floor pattern. To achieve this, we use set squares and spirit levels to ensure the pattern is aligned and level. It is also important to note that the new Victorian tiles are approx. 1.5mm smaller than the original Victorian tiles. We applied this to the large area at the base of the steps. The repairs also included realigning and relaying the door thresholds off the hallway and repairing and relaying three to four damaged sections.

Finally, we worked out the spacing for the border tiles and around the entrance steps.

Victorian Tiled Hallway During Restoration Ware Victorian Tiled Hallway During Restoration Ware

We then regrouted in mid grey to all newly laid areas. We cleaned off the grout haze using Tile Doctor Acid Gel and buffed.

Sealing a Victorian Tiled Hallway Floor

To seal the floor, we first used a consolidator primer seal, Tile Doctor Colour Grow, followed by five applications of a protective acrylic wax seal Tile Doctor Seal and Go, which gave the floor a rich satin finish.

Victorian Tiled Hallway After Restoration Ware

The work took five days to complete. Following the completion of the floor we have advised the customer to maintain the tiles using Tile Doctor Neutral Cleaner which has a neutral pH and so will not impact the sealer.

Victorian Tiled Hallway After Restoration Ware


Restoration of a Victorian Tiled Hallway in Hertfordshire

Victorian Tiled Hallway Reconfigured and Fully Restored in Ware Read More »

=================================

Hertfordshire Tile Doctor

================================= Read More »

Scroll to Top