Watford Tile Cleaning

Watford Tile Cleaning

Welcome to my Work History archive where you will find examples of the cleaning and renovation of tiles carried out in Watford.

Ceramic Bathroom Grout Before After Cleaning Watford

Ceramic Wall Tile and Grout Renovated in a Watford Bathroom

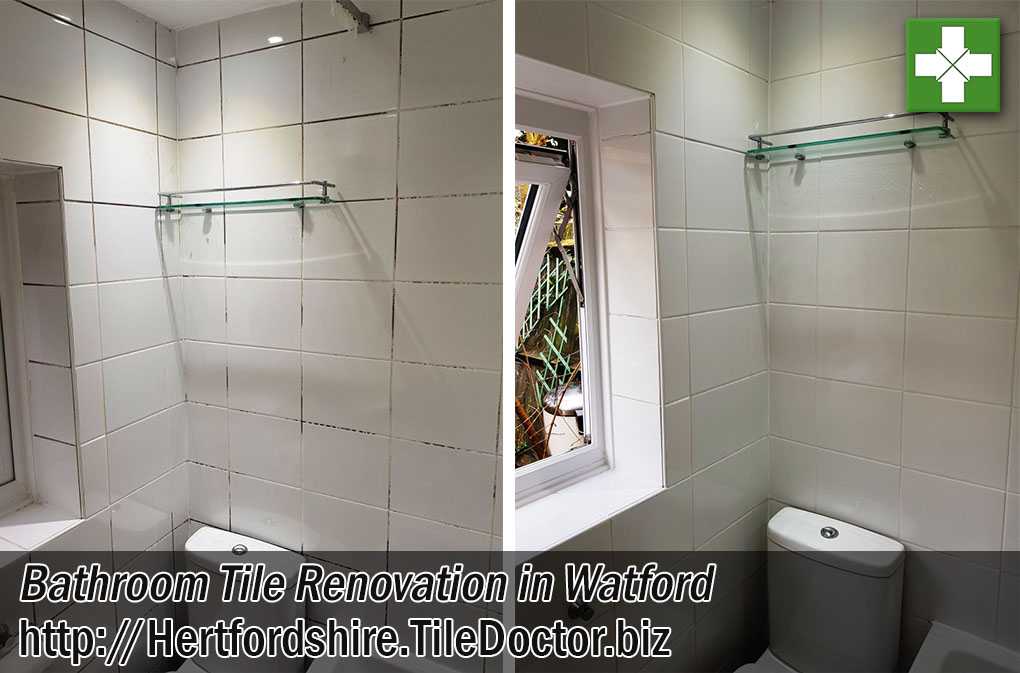
Our client in Watford, Hertfordshire had a fully Ceramic tiled bathroom which was now in need of a deep clean. The tiles themselves were in good physical condition but the grout and silicone sealant were stained black with mould in places and generally not looking very attractive.

Bathroom Ceramic Wall Tiles Before Cleaning Watford Bathroom Ceramic Wall Tiles Before Cleaning Watford

I visited the property to survey the problem and offer a solution. The tiles were indeed looking grubby but with white ceramic tiling the mould stained grout particularly stood out. Mould loves a moist warm environment so the only way to cure it in the long term is to significantly improve ventilation. It can be removed with the right products however, so I explained the cleaning process, agreed a price for the work and booked in a convenient time to do the renovation.

Cleaning a Ceramic Tiled Bathroom

We prepared the areas with protective sheets and tape to threshold edges then applied a specialist double action cleaning product called Tile Doctor Duo Clean. The product is spayed onto the tile and grout, left for five minutes and then scrubbed in using small polypropylene tile pads and detail brushes.

Duo clean is especially formulated to clean grout and remove mould and so an ideal choice for this situation. Working in sections the tile and grout were thoroughly scrubbed and then rinsed off with water to remove the dirt and mould that was released. The tiles were then inspected, and the process carried out a second time. For stubborn areas we used steam to really lift the ingrained dirt out of the grout.

Ceramic tiles have a glazed surface which is very easy to clean so our main focus was the grout which being cementitious does attract dirt and allow mould to get a hold.

Replacing Silicone Sealant in a Ceramic Tiled Bathroom

Last step was to replace the silicone sealant between the bath and tile. This is best removed with a sharp knife taking care not to damage to scratch the bath itself.

After removing all the old silicone, the bath was filled with water so it would adopt the right shape before being resealed. We then reapplied silicone to the bath and wall corner joints using white mould resistant silicone. This is a precise job which can easily look awful if not carried out correctly. Thankfully we have plenty of experience and this job took just one day to complete.
To finish the tile and grout were sprayed with Tile Doctor wall tile & grout sealer which comes in a convenient aerosol spray. The excess was wiped off the tile, as I mentioned before ceramic tiles are glazed so won’t hold a sealer, but the grout will benefit from it.

Bathroom Ceramic Wall Tiles After Cleaning Watford Bathroom Ceramic Wall Tiles After Cleaning Watford

As you can see from the pictures the bathroom now looked as good as new, clean and tidy. The client was very happy with the outcome and now wasn’t embarrassed to let guests use his bathroom.

To maintain the ceramic bathroom tiles, we recommended the use of Tile Doctor Aqua-Pro tile cleaner which is ideal for maintaining porcelain/ceramic bathroom wall tiles. Aqua-Pro is an effective pH neutral tile and grout cleaner which is designed for everyday use in bathrooms. The neutral formula helps to eliminates soap scum build-up and hard water deposits which are all too common. It has a lovely fresh lemon scent which leaves the room smelling clean and fresh. It will help to prevent the discolouration they had previously experienced.


Professional Bathroom Grout Cleaning in Hertfordshire

Ceramic Wall Tile and Grout Renovated in a Watford Bathroom Read More »

Health Club Porcelain floor tiles Before and After cleaning

Porcelain Tile Deep Cleaning at a Hotel Health Club

Some further photographs below of work we did at a London Hotel in the West End where we removed staining from the Limestone laid in reception. These photographs relate to the cleaning of a Porcelain Tiled floor laid in the Health Club changing rooms which although in good condition were in need of a heavy duty clean.

Health Club Porcelain floor tiles changing room before cleaning

Deep Cleaning Porcelain Tiles

Unlike stone Porcelain Tile is a relatively straight forward surface to clean. It does help however if you have the right tools and products for the job as household tools and products can struggle.

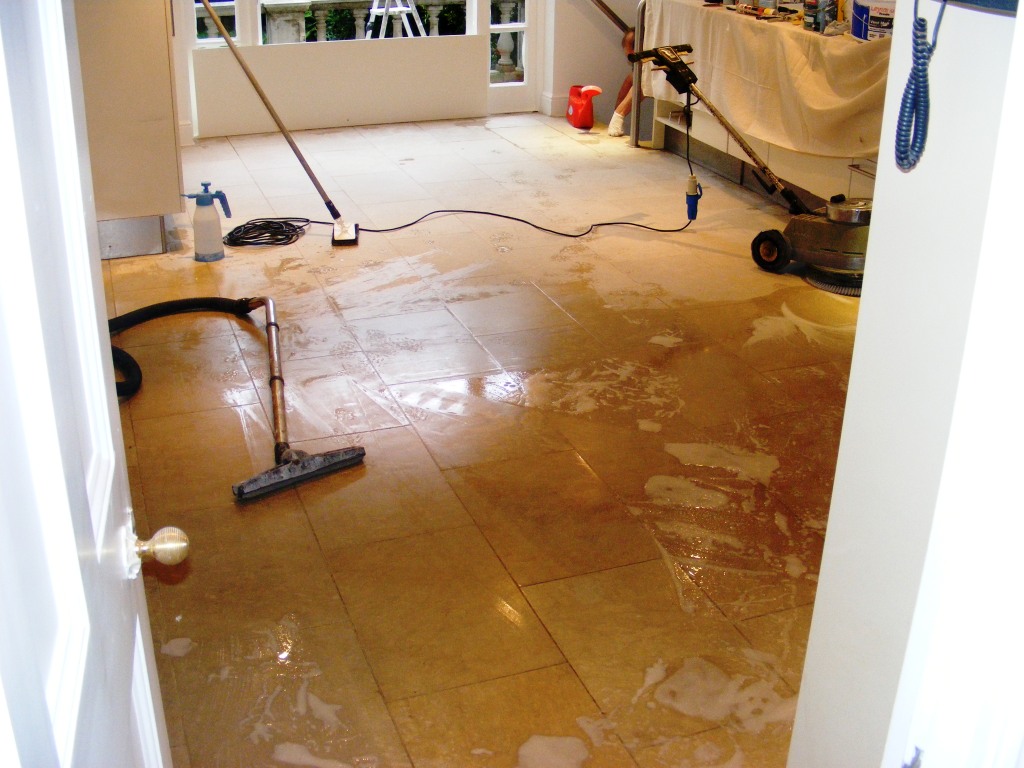
For this floor we applied a 50/50 mix of Tile Doctor Pro-Clean and NanoTech Ultra Clean diluted with three parts water to the dry surface. The solution was left on the surface to dwell for 30 minutes to allow it to penetrate the heavy soiling on the floor. During this time the product was scrubbed in using black polypropylene floor pads on a slow speed orbital scrubber. The soiled cleaning solution was extracted using a wet vacuum before rinsing with clean water.

A second clean using the Tile Doctor Grout Clean-Up was applied diluted with three parts water and the scrubbing process repeated. This was needed in order to penetrate deeper into the porcelain tile and also to remove any calcium (limescale) deposits from the surface. The soiled solution was extracted again using a wet vacuum and then each tile was carefully rinsed using a fan jet power wash to fully flush the tiles and finally wet vacuumed to dry.

Health Club Porcelain floor tiles part way through
You can see from the photographs the difference deep cleaning made to the Porcelain floor, not only did we manage to restore their natural appearance and texture but there was a significant improvement in the wet slip resistance of the tile surface. The work was all completed out of hours between 22.00hr and 06.00 hrs so that there was no disruption to the hotel or health club guests.

Health Club Porcelain floor tiles after cleaning
 

Deep Cleaning a Porcelain Tiled floor at a Health Club in London

Porcelain Tile Deep Cleaning at a Hotel Health Club Read More »

Limestone Floor in London Hotel After Honing and Polishing

Limestone Floor Cleaning at a Hotel in London

Details below of a Limestone floor installed in the reception of a Victorian hotel in London’s West end. The Limestone Floor had been cleaned incorrectly leaving very noticeable staining marks to the grout lines. We were asked to return the floor to its natural appearance and improve the finish from Matt to Polished.

Badly Stained Limestone Floor Hotel Reception

Cleaning the Limestone Floor

Working at night to minimise disruption for the hotel guests our first step was to clean the floor and grout with a dilution of Tile Doctor Pro-Clean. Pro-Clean is ideal for this purpose due to its alkaline formula, acidic products even those with mild acidity will damage the floor over time and can lead to small holes forming where the calcareous stone has been dissolved.

Limestone Floor London Hotel Reception before restoration
The next step was to burnish the floor using four stage diamond encrusted twister pad system. This is a labour intensive process where you scrub the floor using a buffing machines fitted with different pads; each pad is designed for a different purpose and will remove sealers, grind off ingrained dirt, smooth the surface as well as polish.

Polishing and Sealing the Limestone Floor

To obtain the requested highly polished finish the floor was then polished using Tile Doctor Shine crystallising powder which as well as providing a high shine also leaves a tough durable finish, ideal for high traffic areas such as this. We finished off the floor with a single coat of Tile Doctor Colour Grow impregnating sealer which was then buffed to a high shine finish.

Limestone Floor in London Hotel After Honing and Polishing
For regular cleaning we have advised the hotels maintenance team to use a 1-30 dilution of Neutral Cleaner applied with a microfibre flat mop, water rinsed and the dried with second clean microfibre mop.

Limestone Floor Cleaning at a Hotel in London

Limestone Floor Cleaning at a Hotel in London Read More »

Limestone Kitchen Floor Tiles Before and After Cleaning

Cleaning Limestone Floor Tiles In London

We were called in during some major house renovations to restore the Limestone Floor tiles fitted in the kitchen and utility room. This involved a good deep clean, burnishing and then sealing to restore the natural colour and appearance of the stone.

Limestone Kitchen Floor Tiles Before Cleaining Limestone Steps Before Cleaining

The floor was pre cleaned with a dilution of Tile Doctor Pro-Clean and NanoTech Ultra-Clean agitated with a slow speed machine fitted with polypropylene brush, the solution was removed with a wet vacuum rinsed with water and dried.

Limestone Kitchen Floor Pre-Clean
A couple of the floor tiles in the hallway were fractured so the next job was to replace them; this involves chopping out the tile and cleaning up the exposed area so new tiles can be installed and grouted.


Limstone Floor Tile Replacement Prep Limestone Tile Repair Prep
New Inserted Limestone Ready For Burnishing

The Limestone Tiled floor was then Burnished using the four stage Twister Burnishing pad set which removes topical sealers, ingrained dirt before finally polishing the floor into a high shine.

Limestone Tiled Floor Final Stage Sealed And Buffed
Once the final finish had been achieved the floor was sealed with two coats of Tile Doctor Colour Grow sealer which brings out the colour of the tile and provides a protective impregnating seal. The last step was to run a buffing machine over the floor to get that final finish.

Cleaned Limestone Tiled Kitchen Finished Limestone Steps Completed

Before leaving we advised the customer to clean the floor using a neutral frequent use cleaning product such as Tile Doctor Neutral Cleaner, other products can be acidic and can actually dissolve holes in the tile over time. The customer was very pleased with the work we did and left the following comment:

Very professional, high quality job. Rob and his team were a pleasure to deal with and worked hard to meet our time constraints. The floor is unrecognisable from what it was before!

Mr. B. Chapman, London, NW8

Limestone Floor Restoration in London

Cleaning Limestone Floor Tiles In London Read More »

Natural Slate Path Cleaned and Sealed

Cleaning Natural Slate Paving

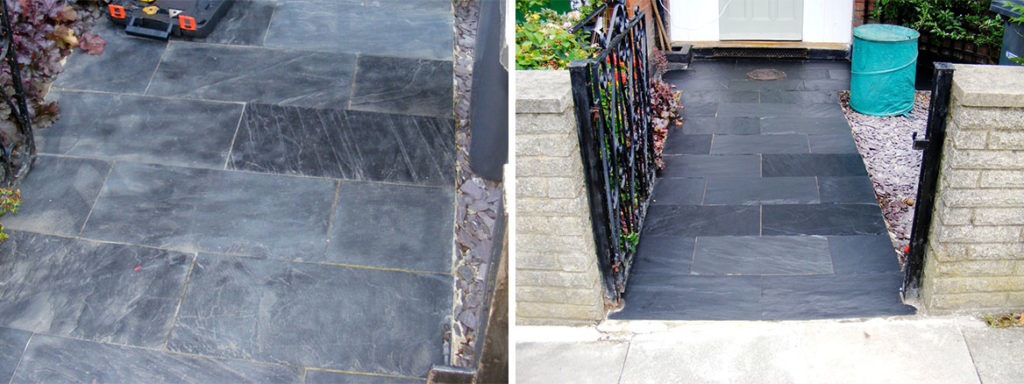
We were asked to take a look at a natural slate paving leading up to the entrance of a lovely old residence in North London. The slate path had only been recently laid, grouted and sealed and the owner was not best pleased with the results and a request was made to remedy the situation and return the slate back to its natural colour and appearance.

Natural Slate Path Before Cleaining Natural Slate Path Before Cleaining

We carried out a series of tests to ensure we could remove both the sealer and grout haze from the surface of the tile. It’s not a good idea to apply a different sealer on top of an existing product as the end results will be inconsistent and the products maybe incompatible. We cleaned up the tile, sealed it and left it to weather for a few days to demonstrate to the customer the durability of the finish.

Natural Slate Path Pre-testing Natural Slate Path Pre-testing

Cleaning Natural Slate Paving

All was well with the test and we got the green light to do the whole slate path. We started by cleaning the path with Tile Doctor Pro-Clean which was then washed off and allowed to dry. We then applied Tile Doctor Remove and Go mixed 50/50 with Tile Doctor NanoTech Ultra Clean; this is a really powerful combination which we left to dwell on the tile for an hour in order to soften up the current sealer and ingrained dirt. The solution was then removed and the slate tile washed down with more water.

Natural Slate Path Mid-Process
With the sealer removed we tackled the Grout Haze by using Grout Clean Up and a fair amount of elbow grease with stainless steel and polypropylene detail brushes.

Last step before sealing was to neutralise the floor with another rinse down, this time washing the tile with Tile Doctor Neutral Cleaner, it’s important that any remaining chemical is removed from the surface otherwise it may upset the sealer.

Sealing Natural Slate Paving

Finally once the slate had dried, we applied 3 coats of Tile Doctor Colour Grow and buffed off the last coat with a buffing pad to bring out the deep colour from within the Slate; the sealer was fully dry and path ready for normal use 12 hours. For maintenance we recommend using Tile Doctor Neutral Cleaner, diluted 1 to 30 with water applied with a microfibre flat mop, rinse with water and dry with second microfibre mop. The customer was very happy with the results and left the following message:

Robert’s communication was excellent and he always kept us informed on what to expect and the timescales involved. He was very reliable and punctual and the quality of his work was to a very high standard. We were very pleased with his work and overall service.
Mr. M. Vaughan, Alexandra Park, London

Natural Slate Path Cleaned and Sealed

Cleaning Natural Slate Paving in North London

Cleaning Natural Slate Paving Read More »

=================================

Hertfordshire Tile Doctor

================================= Read More »

Scroll to Top